Step #1: Boil some water (if you don't know how to do that, you may want to buy this book).

Step #2: While the water is getting there, we prepare the Aeropress. First by having a filter in the filterholder (Pro's design their own metal filter, more flavour they say).

Step #3: Attach it to the Aeropress.

Step #4: Head up to the attic and get that old scale which measures decimal grams. You badly need it to achieve the status as a perfectionist freak.. I mean, to measure the exact amount of coffee to grind. For this type (the Brazilian Fazenda Rainha), my tastebuds and me agreed 12 grams to be the optimal.

Step #5: Grind some of that freshly roasted coffee. I prefer having it grinded a bit coarser that espresso. Less «dense» taste, and more flavours.

Step #6: For this coffee, 12 grams should be perfect. And the scales measures that just fine (as you see, I put the Aeropress on the scales before I switched it on, so it aligns the weight of the Aeropress itself to be 0,0 grams. Hence, it measures only the content of the Aeropress - that would be the coffee -.

Step #7: Find your favorite mug (preferrably pre-heated) and put the Aeropress on top. Now you have decorated your favorite mug with a silk hat, cool eyh?

Step #8: Pour water into the Aeropres. You want to be exact about how much water you pour. To apprx. 12 grams that would be 2.2 deciliters with hot water.

Step #9: Stir! And enjoy the beautiful aroma... however, be quick, this process should only take a few seconds and is critical for the final result. You wouldn't leave the hot water in contact with the coffee for too long. I would say extract it for 10 seconds, and use 10 seconds on the next step, which is:

Step #10: Puuuuuush it like you mean it! Firm, yet controlled. I actually find this to be the most exciting part of the process, don't ask why... (I usually use both hands to stabilize, but I had to keep one hand on the camera when taking this picture).

Step #11: Bring your Aeropress to the sink and remove the filterholder. That should leave you with a nice puck right behind that filter. Now, hold it over your trash can or «dunkeboks» (a specially designed trash can for coffee grounds)

Step #12 and #13: Hygiene! The most important part of any coffee-related activity. Dirty equipment never yields off great coffee, and you should always have that as a first priority. With the Aeropress, cleaning is simpler than ever!


Step #14: Enjoy your coffee! Don't drink it too hot, you won't be able to taste the great flavours then. Wait until it doesn't smoke anymore. Also, you know you have found the right water/amount of coffee ratio when the coffee is relatively brown rather than blackish when holding it under a light or having it outside. To expose that, try having it in a glass rather than a cup. See an example of the color here!
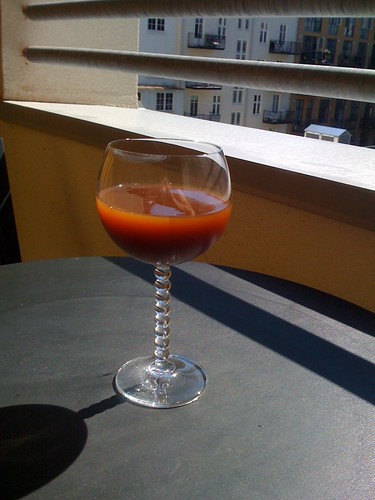

Step #15: Repeat the process for your friends, family, dogs, cats, neighbours and of course yourself!
Happy Aeropressing! Oh, yeah... you may buy this wonder at Ebay. About 250-300 kroner delivered on your door. Or you could of course buy it at Tim Wendelboe if you live close to Oslo, a bit more expensive, but comes with qualified guidance on how to use it. And you have to stop by there anyways, to pick up some of that great Fazenda Rainha!
1 kommentar:
De selger den også på Kaffemisjonen (Kaffemosjonisten som jeg kaller den) her i Bergen.
Legg inn en kommentar